Lab 03a - Manage Azure resources by Using the Azure Portal
Student lab manual
Lab scenario
You need to explore the basic Azure administration capabilities associated with provisioning resources and organizing them based on resource groups, including moving resources between resource groups. You also want to explore options for protecting disk resources from being accidentally deleted, while still allowing for modifying their performance characteristics and size.
Objectives
In this lab, we will:
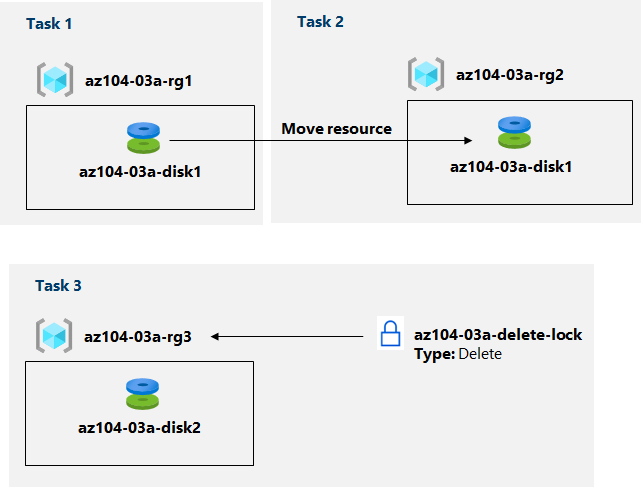
- Task 1: Create resource groups and deploy resources to resource groups
- Task 2: Move resources between resource groups
- Task 3: Implement and test resource locks
Estimated timing: 20 minutes
Architecture diagram

Instructions
Exercise 1
Task 1: Create resource groups and deploy resources to resource groups
In this task, you will use the Azure portal to create resource groups and create a disk in the resource group.
-
Sign in to the Azure portal.
-
In the Azure portal, search for and select Disks, click + Create and specify the following settings:
Setting Value Subscription the name of the Azure subscription where you created the resource group Resource Group the name of a new resource group az104-03a-rg1 Disk name az104-03a-disk1 Region the name of the Azure region where you created the resource group Availability zone None Source type None Note: When creating a resource, you have the option of creating a new resource group or using an existing one.
-
Change the disk type and size to Standard HDD and 32 GiB, respectively.
-
Click Review + Create and then click Create.
Note: Wait until the disk is created. This should take less than a minute.
Task 2: Move resources between resource groups
In this task, we will move the disk resource you created in the previous task to a new resource group.
-
Search for and select Resource groups.
-
On the Resource groups blade, click the entry representing the az104-03a-rg1 resource group you created in the previous task.
-
From the Overview blade of the resource group, in the list of resource group resources, select the entry representing the newly created disk, click Move in the toolbar, and, in the drop-down list, select Move to another resource group.
Note: This method allows you to move multiple resources at the same time.
-
Below the Resource group text box, click Create new then type az104-03a-rg2 in the text box. On the Review tab, select the checkbox I understand that tools and scripts associated with moved resources will not work until I update them to use new resource IDs, and click Move.
Note: Do not wait for the move to complete but instead proceed to the next task. The move might take about 10 minutes. You can determine that the operation was completed by monitoring activity log entries of the source or target resource group. Revisit this step once you complete the next task.
Task 3: Implement resource locks
In this task, you will apply a resource lock to an Azure resource group containing a disk resource.
-
In the Azure portal, search for and select Disks, click + Create and specify the following settings:
Setting Value Subscription the name of the subscription you are using in this lab Resource Group click create new resource group and name it az104-03a-rg3 Disk name az104-03a-disk2 Region the name of the Azure region where you created the other resource groups in this lab Availability zone None Source type None -
Set the disk type and size to Standard HDD and 32 GiB, respectively.
-
Click Review + Create and then click Create.
-
Click Go to resouce.
-
On the Overview page of the Disk, click the name of the resource group, az104-03a-rg3.
-
On the az104-03a-rg3 resource group blade, click Locks then + Add and specify the following settings:
Setting Value Lock name az104-03a-delete-lock Lock type Delete -
Click OK
-
On the az104-03a-rg3 resource group blade, click Overview, in the list of resource group resources, select the entry representing the disk you created earlier in this task, and click Delete in the toolbar.
-
When prompted Do you want to delete all the selected resources?, in the Confirm delete text box, type yes and click Delete.
-
You should see an error message, notifying about the failed delete operation.
Note: As the error message states, this is expected due to the delete lock applied on the resource group level.
-
Navigate back to the list of resources of the az104-03a-rg3 resource group and click the entry representing the az104-03a-disk2 resource.
-
On the az104-03a-disk2 blade, in the Settings section, click Size + performance, set the disk type and size to Premium SSD and 64 GiB, respectively, and click Resize to apply the change. Verify that the change was successful.
Note: This is expected, since the resource group-level lock applies to delete operations only.
Clean up resources
Note: Do not delete resources you deployed in this lab. You will be using them in the next lab of this module. Remove only the resource lock you created in this lab.
- Navigate to the az104-03a-rg3 resource group blade, display its Locks blade, and remove the lock az104-03a-delete-lock by clicking the Delete link on the right-hand side of the Delete lock entry.
Review Questions
- If you add a Resource Lock to a Resource Group, will the resources inherit the lock as well?
- You have created a Read only lock. Can you shut down a Virtual Machine?
- At what levels can you add a lock?
Review
In this lab, you have:
- Created resource groups and deployed resources to resource groups
- Moved resources between resource groups
- Implemented and tested resource locks